Grow Stunning Asiatic Lilies in Your Backyard

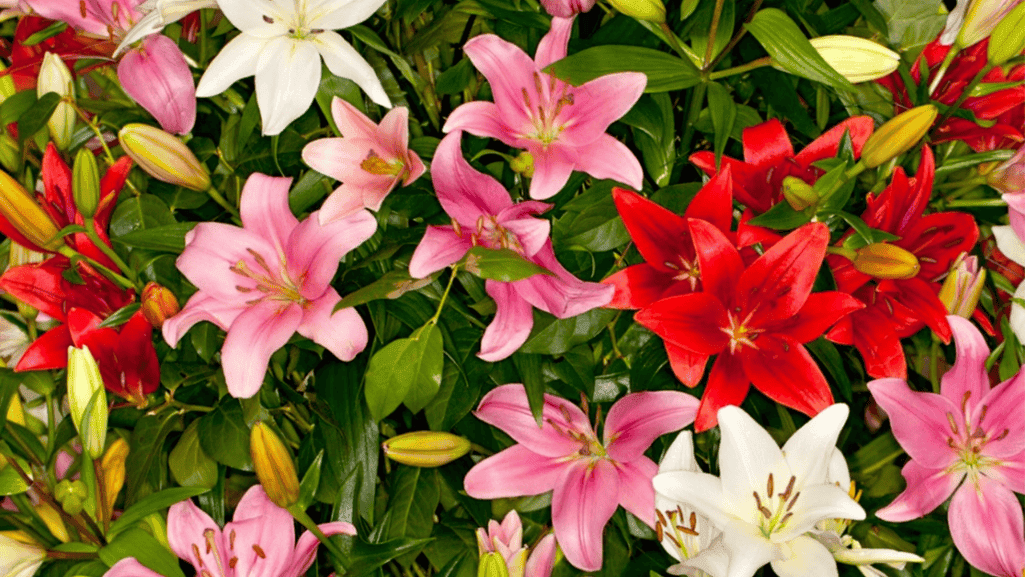
Bring bold, modern blooms to your garden with asiatic lilies. These hardy perennial bulbs thrive in USDA Zones 4–9 and produce upright, star-like flowers that measure 4–6 inches across. Their vivid colors—from fiery orange to soft white—make a striking summer display without heavy scent.

Planting is simple: set bulbs about 8 inches deep and 8 inches apart in loose, slightly acidic to neutral soil. They prefer full sun above and cool roots below, so pair them with airy companions that shade the base while letting the tops sunbathe.

Most plants reach a few feet tall and bloom from late spring into midsummer for roughly a month. Bulbs often double each year, giving you more stems and longer seasons of blossoms. Note that all parts of the plant are toxic to cats and dogs, so place them safely away from pets.

For detailed care tips, check this comprehensive asiatic lily guide.

Key Takeaways

  • asiatic lilies deliver bold colors and reliable bloom in Zones 4–9.
  • Flowers are 4–6 inches wide and last from late spring into summer.
  • Plant bulbs 8 inches deep, in well-drained, slightly acidic soil.
  • Many varieties reach a few feet tall and also fit containers.
  • Bulbs multiply yearly, increasing stems and blossoms over time.

Why Asiatic Lilies Belong in Your Garden

https://www.youtube.com/watch?v=yybXuAQ1ttc

Plant them for an early show: these hardy bulbs are often the first to bloom each season, opening 4–6 inch flowers in late spring and into early summer. Their low fragrance makes them ideal for mixed beds and indoor bouquets.

Count on bold colors and simple care. This group offers the broadest range of hues among similar garden bulbs, from warm golds to deep reds. Sturdy stems mean you rarely need staking, so beds look tidy with little work.

They also make excellent cut stems that last in vases. Cold-hardy to about −35°F and suited to USDA Zones 4–9, these perennial plants reliably come back when sited well and given basic care.

  • Early-season impact that signals summer.
  • Wide variety of colors to fit any palette.
  • Low maintenance: pest-resistant and self-supporting.
  • Perennial habit — they return every year and multiply over time.

Plan Your Planting: Zones, Sun, Soil, and Space

Pick a sunny site in USDA Zones 4–9 so bulbs get the energy they need to produce strong stems and vivid blooms.

USDA Zones 4–9 and site selection

Choose a sunny garden location in Zones 4–9 to set asiatic lilies up for vigorous growth and showy bloom. Note wind exposure and pick a sheltered spot if tall stems worry you.

Full sun with at least six hours—cool roots, warm tops

Aim for full sun with at least six hours of direct light daily for abundant flowering. Keep tops warm while protecting roots; mulch or low leafy companions help shade the soil without blocking light.

Asiatic Lilies1

Loose, well-drained soil prep with organic mix

Favor loose, moist, well-drained soil with a pH near 6.0–6.5. Prepare beds weeks ahead by adding organic compost to improve structure and drainage.

  • Test drainage by watering a small patch; if water pools, add grit or compost.
  • Plan spacing and sightlines so taller plants don’t shade lower ones; mark spots with stakes to keep even inches of spacing.
  • Map irrigation to avoid dry pockets or soggy zones and protect roots from rot.

Tip: Prioritize an organic mix when amending soil; it feeds bulbs and helps the bed perform year after year.

When and Where to Plant Asiatic Lilies

Planting at the right time gives bulbs a head start for stronger stems and fuller bloom.

plant asiatic lilies

Spring vs. late summer to early fall timing

You can plant in spring for a quick start, or choose late summer to early fall so roots set before winter. Fall planting helps bulbs establish and often yields more vigorous growth the next year.

Garden beds, borders, and mixed plantings for root shade

Pick sunny beds or borders where the tops get full light and the soil stays cool. Slot these bulbs into mixed plantings so companion foliage or mulch provides gentle root shade.

  • Plant bulbs in spring for an immediate start, or in late summer to early fall to make sure roots establish.
  • Choose garden beds and borders with strong light above and cool soil below.
  • Use mixed plantings to shield roots, conserve moisture, and reduce weeds.
  • Stagger varieties so asiatic lilies bloom from late spring into midsummer and extend color.
  • Keep a simple log of date and bed so you can compare performance year to year.

How to Plant Bulbs: Depth, Spacing, and Orientation

Planting right from the start sets the stage for strong stems and lasting color. Follow simple depth and spacing rules so each bulb can root, push up, and bloom without crowding.

plant asiatic lilies

Planting depth and spacing

Dig holes 6–8 inches deep to keep roots cool through warm weather and protect bulbs from temperature swings. Space bulbs about 8 inches apart so each stem has room to grow and flower.

Orientation matters

Set the bulb with the pointy end up and the flat basal plate down. This alignment helps sprouts emerge quickly and evenly. Backfill with friable soil and gently firm the bed so bulbs make good contact with the soil.

Watering, mulch, and drainage

Water thoroughly after planting to remove air pockets and settle the soil. Add 2–3 inches of mulch to moderate temperature and conserve moisture.

  • Avoid soggy spots; amend heavy soil or use a raised bed to improve drainage.
  • Label plantings by cultivar to track bloom time and combinations.
  • Keep the area lightly moist until steady rains or cold set in.

Sun, Water, and Feeding for Season-Long Strength

Give your garden a solid routine of sun and steady moisture to keep blooms strong all season. Good light, measured watering, and a simple spring feed are the keys to healthy growth.

Light to Fuel Flower Power

Aim for full sun with at least six hours of direct light each day. This steady sun helps buds form and opens more large, colorful blooms.

Watering that Builds Deep Roots

Water consistently at about 1-2 inches water per week, adjusting for hot or dry spells. Let the top inch of soil dry between waterings to cut risk of rot.

“Deep, infrequent watering builds stronger roots than frequent shallow sprays.”

Feeding Without Foliage Overgrowth

In spring, feed with a balanced slow-release fertilizer (for example, 10-10-10) to support stems and bud set. Avoid high-nitrogen mixes that make leaves at the expense of flowers.

  • Make sure mulch stays 2–3 inches thick to regulate soil temperature and moisture.
  • Monitor plants during heat; deep watering strengthens roots more than light misting.
  • Check soil by hand—if the top inch is dry, it’s time to water again.
  • Avoid overhead spray when possible so foliage stays dry and disease risk falls.

Care Through the Year: From Buds to Die Back Naturally

Post-bloom care is the quiet work that builds next year’s show. After flowers fade, small, steady actions keep bulbs healthy and beds tidy through the fall and winter.

die back naturally

Deadhead and let foliage feed the bulbs

Snip spent blooms to keep borders neat, remembering these plants will not rebloom this year. Removing spent flowers directs energy back into the bulb instead of seed production.

Leave green stems and leaves alone. They photosynthesize and refill the bulb with reserves for the next year. Avoid tying or bending live foliage; let it die back naturally.

Cutback, mulch, and winter protection

Wait until the foliage browns in fall before cutting stems to the ground. This visible die back naturally signals bulbs are dormant and safe to prune.

  • Refresh mulch each autumn to protect bulbs and stabilize soil temperatures.
  • Keep the bed weed-free so leaves capture max light through the late season.
  • Water during dry spells after flowering to aid bulb building.
  • Inspect and clear debris in late season to reduce disease pressure.

Propagation Made Simple: Division, Bulblets, and Scales

After flowering, many bulbs form offsets you can use to expand your beds next season. Propagation is an easy, rewarding way to multiply color and vigor in your garden.

bulbs propagation

Divide clumps in early fall and replant immediately

In early fall, lift mature clumps and gently separate offsets. Make sure each division has healthy scales and some roots.

Replant each piece at the same depth right away to avoid drying. This step refreshes vigor and boosts blooms the next year.

Harvest and grow stem bulblets

Bulblets often form along buried stems. Detach them with any tiny roots and pot in a light nursery mix.

Keep these starts evenly moist in bright, indirect light and grow them on until spring before moving to the bed.

Scale propagation in damp peat at about 70°F

For more copies, remove a few outer scales and place them in damp peat or vermiculite at roughly 70°F.

In 6–12 weeks small bulblets will appear. Pot them up and care for them until planting time.

“Always discard any divisions that show disease to protect the rest of the bed.”

  • Divide in early fall to multiply blooms.
  • Lift carefully; replant promptly.
  • Label starts to track vigor and bloom.

Container Success: Potting Mix, Drainage Holes, and Repotting

Growing in a container means you control soil, drainage, and season-long moisture. That control makes pots ideal for adding vibrant lilies to small spaces or patios.

Choose the right pot and plant depth

Select a sturdy container with ample drainage holes so water never pools around roots. Plant bulbs about 6 inches below the rim for proper root room and stem support.

Use a 7-inch pot for one standard bulb or three dwarf bulbs spaced roughly 2 inches apart for balanced growth.

Potting media and watering rhythm

Fill pots with a premium potting mix that drains yet holds some moisture. Container media dries faster than garden soil, so check the top layer often and adjust your water per week as temperatures change.

  • Drainage holes: make sure they are clear and elevate pots slightly to aid airflow.
  • Potting mix: refresh when repotting to renew nutrients and structure.
  • Choose compact varieties for tidy proportions, often 1–2 feet tall.
  • Repot in early spring or right after flowering in late summer to refresh the mix and give bulbs room to grow.

“A well-aired pot with the right mix makes every bulb thrive.”

Keep Blooms Pristine: Common Pests and Diseases

Protecting your blooms starts with quick detection and simple routines. Scout beds early in spring and act at the first sign of damage to keep color and form intact.

Red beetles and larvae

Watch for the red lily leaf beetle in spring. Hand-pick adults and eggs, then drop them into soapy water.

Break the life cycle by treating larvae on contact with neem oil or spinosad.

Aphids and virus control

Blast aphids with a firm spray or use insecticidal soap to protect plants from viruses.

If virus symptoms appear, remove and trash affected material and disinfect tools. Do not compost infected debris.

Fungal threats and root rot

Botrytis blight thrives in damp, still air—encourage airflow by spacing and thinning nearby foliage.

Improve soil drainage and avoid overwatering to prevent basal rot at the bulb’s basal plate. In containers, make sure drainage holes work and use a well-draining mix.

  • Scout early for the red lily leaf and crush egg rows when found.
  • Use neem or spinosad against larvae; treat on contact.
  • Sanitize tools and clear debris to lower disease pressure.

Bloom Time, Colors, and Favorite Varieties

Timing and selection shape the season. Plan plantings so your beds shift from late spring into full summer color. Expect each group to produce showy blooms for roughly a month when sited and fed well.

When they flower

asiatic lilies bloom from late spring through midsummer. Flowers open as upright to outward-facing cups about 4–6 inches wide. That concentrated display makes them ideal for bold seasonal impact.

Colors, petals, and standout cultivars

These bulbs offer a vast color range and dramatic petal shapes. Many sport contrasting freckles and ruffled edges that read well from pathways and patios.

  • Plan waves of color by combining early and mid-season plants so lilies bloom in sequence.
  • Favorites to try: ‘Forever Susan,’ ‘Blackstone,’ ‘Enchantment,’ ‘Red Velvet,’ ‘Purple Marble,’ and ‘Hotel California.’
  • Add LA hybrids for fragrance and added height—many reach about 4 feet tall and tolerate heat.

Tip: Remove pollen-laden anthers as buds open to extend vase life and keep stems stain-free. Track which variety thrives in your site and refine selections the next season.

Conclusion

A small investment of soil prep and sun pays off with bold stems and repeat blooms year after year.

Plant bulbs 6–8 inches deep and about 8 inches apart in loose, well-drained, slightly acidic soil. Sit them in full sun, water roughly 1–2 inches per week, and feed in spring with a balanced fertilizer.

Mulch to keep roots cool, divide clumps every few years, and use containers with clear drainage holes and a quality potting mix when space is tight.

Expect upright flowers from late spring into midsummer. Keep notes on what thrives, and visit our lilies guide for planting details and variety ideas.

FAQ

When is the best time to plant bulbs in my garden?

Plant in spring after the last frost for quick establishment, or in late summer to early fall so roots form before winter. Fall planting gives a head start, but spring planting works well in colder zones.

How deep and how far apart should I plant bulbs?

Plant bulbs about 6–8 inches deep with roughly 8 inches between each. This depth protects bulbs from temperature swings and supports sturdy stems and healthy blooms.

Which planting sites get the best results?

Choose a sunny spot with at least six hours of direct sun daily and loose, well-drained, slightly acidic soil. Provide some mulch or low groundcover to keep roots cool while the tops enjoy warmth.

How much water do these plants need during the growing season?

Aim for about 1–2 inches of water per week, adjusting for rainfall. Allow the soil surface to dry between waterings to prevent rot; containers may need watering more often.

What fertilizer should I use and when?

Apply a balanced, slow-release fertilizer in early spring when shoots emerge. Avoid high-nitrogen feeds, which promote foliage over blooms. A second light feed after flowering can support next year’s growth.

How do I care for plants after they finish blooming?

Deadhead spent blossoms to keep the bed tidy, but leave foliage until it yellows and dies back naturally. The leaves photosynthesize to refill bulbs for the next season.

When should I cut back stems and apply mulch for winter?

Cut stems back only after foliage has browned in fall. Once cut back, apply a layer of mulch to insulate bulbs against extreme cold and moisture fluctuations.

Can I grow these bulbs in containers, and what do I need to consider?

Yes. Use a pot with good drainage holes, quality potting mix, and plant bulbs about 6 inches below the rim. Containers dry faster, so monitor moisture and repot as needed every few years.

What pests and diseases should I watch for, and how do I manage them?

Watch for red lily leaf beetles—hand-pick or use neem or spinosad—plus aphids and fungal issues like botrytis and basal rot. Maintain good airflow, proper drainage, and remove infected plants promptly.

How can I propagate bulbs to increase my planting?

Divide clumps in early fall and replant right away. Harvest stem bulblets for next season, or use scale propagation in damp peat at around 70°F to grow new bulbs from scales.

How tall will these plants grow and when do they typically bloom?

Many reach about 2–4 feet tall and produce blooms from late spring into mid-summer, depending on the variety and local climate.

Do I need to worry about drainage in planting beds?

Yes. Good drainage prevents basal rot. Amend heavy clay with organic matter or plant on a raised bed to keep bulbs healthy and long-lived.

Will bulbs come back every year, or should I replant annually?

With proper siting, feeding, and winter protection, bulbs usually return year after year. Divide overcrowded clumps every few years to maintain vigor and bloom quality.
Salvias in winter
How to Protect and Care for Salvias During Winter
Salvias in winter are beloved garden treasures that bring vibrant colors and attract pollinators throughout...
Ranunculus Flowers
Ranunculus Flowers: Elegant and Easy-to-Grow Blooms
Ranunculus Flowers are standout cut flowers known for lush, rose-like layers and a stunning range of...
Baking soda is magic for plant
Baking Soda is magic for plant: A Surprising Plant Revitalizer
Baking soda is magic for plant Quick, low-cost help can sometimes make the difference between struggling...
Dwarf Morning Glory
Dwarf Morning Glory: A Compact Floral Delight
Dwarf Morning Glory is a compact, mounding choice for small spaces and containers. The Blue My Mind Evolvulus...
Chili Peppers
Chili Peppers: Spice Up Your Life
Chili peppers are pungent berry fruits from the genus Capsicum in the nightshade family. They add bright...
Colorful chrysanthemums flower varieties in autumn garden display
The Ultimate Guide to Chrysanthemums: Types, Care, and Symbolism
Chrysanthemums Flower, often simply called “mums,” are the quintessential autumn flower that...
Rabeya Khanom
Rabeya Khanom
Articles: 68

Leave a Reply

Your email address will not be published. Required fields are marked *