Beautiful flowers gardenia Plants For Your homes
 Skip to content
Beautiful flowers gardenia Plants For Your homes

Planting, care, and top varieties for bold summer color — practical tips to plant and tend asiatic lilies for repeat blooms.
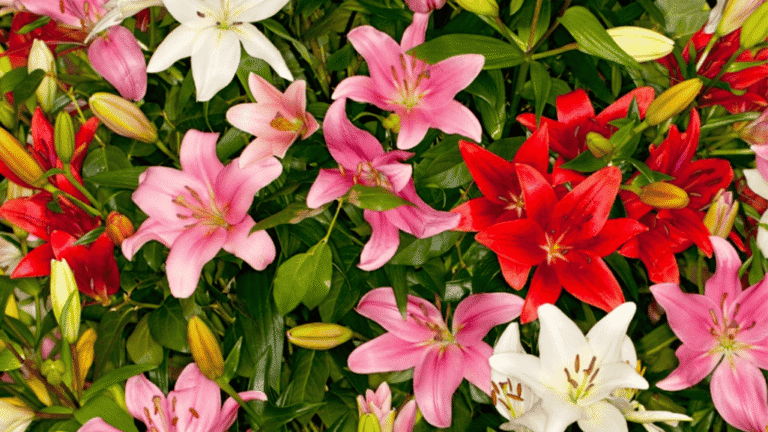
Bring bold, modern blooms to your garden with asiatic lilies. These hardy perennial bulbs thrive in USDA Zones 4–9 and produce upright, star-like flowers that measure 4–6 inches across. Their vivid colors—from fiery orange to soft white—make a striking summer display without heavy scent.
Planting is simple: set bulbs about 8 inches deep and 8 inches apart in loose, slightly acidic to neutral soil. They prefer full sun above and cool roots below, so pair them with airy companions that shade the base while letting the tops sunbathe.
Most plants reach a few feet tall and bloom from late spring into midsummer for roughly a month. Bulbs often double each year, giving you more stems and longer seasons of blossoms. Note that all parts of the plant are toxic to cats and dogs, so place them safely away from pets.
For detailed care tips, check this comprehensive asiatic lily guide. Read on for step‑by‑step planting, watering, and variety picks to make your garden pop.
Plant them for an early show: asiatic lilies reliably open 4–6 inch flowers from late spring into early summer, often preceding heavier-scented groups like oriental lilies. Their low fragrance and bold colors make them excellent for mixed borders and long-lasting cut stems for vases.
Bold color with simple care. Asiatic lilies offer one of the widest palettes among garden bulbs — from gold and orange to deep reds and near-black varieties — and sturdy stems that usually don’t need staking. They perform well in beds, borders, and dedicated cutflower patches.
Cold-hardy in the right sites (commonly suited to USDA Zones 4–9) and tolerant of a range of soils when drained, these perennial plants generally come back each year when you make sure they have sun, good soil, and basic care. Note: keep lilies away from curious pets — all parts are toxic to cats and dogs.
Pick a sunny site in USDA Zones 4–9 so asiatic lilies get the energy they need for strong stems and vivid flowers. If your garden is windy, choose a sheltered bed or plant near a low hedge to protect tall stems without reducing light.
Choose a sunny garden spot in Zones 4–9 and avoid low, water‑logged hollows. Mark out beds and sightlines so taller lilies don’t hide smaller companions; a quick stake layout helps you keep even spacing and attractive sightlines.
Aim for full sun with at least six hours of direct light each day to maximize blooms. Keep the soil surface cooler with 2–3 inches of mulch or low, airy groundcover so roots stay cool while the foliage and flowers enjoy sun.
Favor loose, moist, well-drained soil with a pH near 6.0–6.5. Amend heavy clay by working in 2–4 inches of organic compost per square foot and a handful of grit to improve drainage; for sandy sites, add compost to increase moisture retention.
Tip: Prioritize an organic mix when amending soil — compost feeds bulbs slowly and improves bed performance year after year.
Planting at the right time gives bulbs a head start for stronger stems and fuller bloom.
You can plant bulbs in spring after the last hard frost for a quick start, or plant in late summer to early fall so roots establish before winter. For fall planting, aim to finish 4–6 weeks before your area’s first hard frost (check local frost dates for your zone). Fall planting often helps bulbs set stronger roots and produce more vigorous growth the following year.
Pick sunny beds or borders where the tops receive full light and the soil remains cool. Slot asiatic lilies into mixed plantings so companion foliage or a light mulch provides gentle root shade without shading the flower stems.
Planting right from the start sets the stage for strong stems and lasting color. Follow these simple depth and spacing rules so each bulb can root, push up, and bloom without crowding.
Dig holes 6–8 inches deep (measure from the soil surface to the top of the bulb) to keep roots cool through warm weather and protect bulbs from temperature swings. Space bulbs about 8 inches apart so each stem has room to grow and flower. For dwarfs, you can reduce spacing to about 4–6 inches.
Quick planting table (guide): Standard bulbs: 6–8 inches deep, 8 inches apart. Dwarf bulbs: 4–6 inches deep, 4–6 inches apart. Containers: plant 6 inches below the rim; use a 7‑inch pot for one standard bulb or three dwarf bulbs.
Set each lily bulb with the pointy end up and the flat basal plate down — simple visual cue: pointed end = top. Backfill with friable, fine soil and gently firm the bed so the bulb makes good contact without compacting the soil.
Water thoroughly after planting to remove air pockets and settle the soil. Add 2–3 inches of mulch to moderate soil temperature and conserve moisture — apply mulch after planting to avoid smothering new shoots. Avoid soggy spots; amend heavy soil or use raised beds to improve drainage.
Give your garden a simple routine of steady sun and measured moisture to keep blooms strong all season. Good light, consistent watering, and a light spring feed are the keys to healthy asiatic lilies.
Aim for full sun with at least six hours of direct light daily — consistent sun encourages more and larger flowers. This ties back to earlier site tips: pick a spot with long morning and midday sun for best results.
Provide steady moisture equal to about 1–2 inches water per week, adjusting for heat and soil type. In heavy clay reduce frequency but increase soak time; in sandy soil water a bit more often. A simple way to check: if the top inch of soil is dry, it’s time to water.
Practical watering guidance: a drip line typically needs 30–60 minutes twice weekly (depending on emitter flow) to deliver ~1 inch; a soaker hose can run 30–45 minutes. For hand-watering, soak the root zone thoroughly so water penetrates 6–8 inches down.
“Deep, infrequent watering builds stronger roots than frequent shallow sprays.”
Feed bulbs in early spring with a balanced slow‑release fertilizer (for example, 10‑10‑10) to support stems and bud set. Avoid high‑nitrogen formulas that encourage leaf growth over flowers. Consider a light follow-up feed after flowering to support next year’s bulbs.
Post-bloom care is the quiet work that builds next year’s show. After flowers fade, small steady steps—deadheading, leaving foliage to feed bulbs, and sensible winter protection—keep beds healthy and make sure bulbs come back every year.
Snip spent blooms as they fade to keep beds tidy and to direct energy back into the bulb instead of seed production. Remove only the flower head—leave the green stem and leaves alone so they can photosynthesize and refill the bulb for next season.
Resist tying or cutting foliage early; let it die back naturally. That delayed die back is how bulbs store reserves and is essential if you want them to come back strong every year.
Wait until foliage fully browns in fall before cutting stems to the ground—this visible die back signals bulbs have gone dormant. Once cut back, refresh mulch to insulate bulbs and stabilize soil temperatures.
After flowering, many bulbs form offsets you can use to expand your beds next season. Propagation is an easy, rewarding way to multiply color and vigor in your garden — choose the method that fits your time and skill level.
In early fall, lift mature clumps and gently separate offsets so each piece has healthy scales and some roots. Replant divisions at the same depth right away to prevent drying; this refreshes vigor and typically boosts blooms the next year.
Safety note: discard any divisions showing rot or discoloration, and sanitize tools between cuts to protect the bed.
Bulblets commonly form along buried stems. Gently detach them with any tiny roots and pot in a light nursery mix or fine potting mix. Keep evenly moist in bright, indirect light and grow them on through winter; many bulblets take 1–2 years to reach flowering size.
For larger numbers, remove a few healthy outer scales, dust any wounds with a fungicide if desired, and place scales in damp peat or vermiculite at roughly 70°F. Small bulblets typically appear in 6–12 weeks; pot them on and grow until planting time.
“Always discard any divisions that show disease to protect the rest of the bed.”
Growing in a container means you control soil, drainage, and season-long moisture. Containers are perfect for patios and small gardens — they let you plant asiatic lilies where garden soil is poor or space is limited.
Select a sturdy container with ample drainage holes so water never pools around roots. Plant bulbs about 6 inches below the rim for proper root room and stem support — this places the bulb at the correct depth while keeping the crown accessible.
A 7‑inch pot suits one standard bulb; three dwarf bulbs fit well in the same size if spaced roughly 2 inches apart. For multiple standard bulbs or mixes, choose wider, heavier pots to prevent tipping when tall stems form.
Fill pots with a premium potting mix that drains yet holds moisture — a blend of composted bark, peat or coir, and perlite works well. Container media dries faster than garden soil, so check the top layer frequently and adjust your water per week accordingly.
Container checklist: sturdy pot with drainage holes, quality potting mix, grit or perlite, mulch, label, and a saucer with drainage clearance. Elevate pots slightly for airflow and to keep drainage holes clear.
“A well-aired pot with the right mix makes every bulb thrive.”
Protecting your blooms starts with quick detection and simple routines. Scout beds early in spring and act at the first sign of damage to keep color and form intact.
The red lily leaf beetle is a common pest on lily leaves and can quickly defoliate plants. In spring, hand‑pick shiny red adults and bright orange eggs on the undersides of leaves and drop them into soapy water.
Break the life cycle: treat larvae on contact with neem oil or spinosad. Follow label instructions — generally repeat applications every 7–14 days while larvae are active. Take care around pollinators: apply in the evening and avoid spraying blooms.
Aphids cluster on new growth and can transmit viruses. Blast them off with a firm jet of water or apply insecticidal soap. Check for sticky honeydew, curled leaves, or mottling — signs of virus; if a plant shows viral symptoms, remove and bag the plant material and disinfect tools (do not compost infected debris).
Botrytis blight shows as gray fuzzy rot on foliage and buds in damp, still conditions. Improve airflow by spacing plants and thinning dense foliage. Basal or bulb rot develops in waterlogged soil — improve drainage and avoid overwatering to protect the bulb’s basal plate.
In containers, make sure drainage holes are clear and use a well-draining potting mix to reduce fungal risk.
Timing and selection shape the season. Plan plantings so beds move from late spring into full summer color. With good siting and feeding, each group typically produces showy blooms for roughly a month.
Asiatic lilies bloom from late spring through midsummer. Flowers open as upright to outward-facing cups about 4–6 inches wide, offering concentrated color perfect for beds and borders.
These bulbs deliver a vast color range and dramatic petal shapes — many have speckles or ruffled edges that read well from paths and patios. To extend the display, plant early-, mid-, and late-season varieties in waves.
Tip: Remove pollen-laden anthers as buds open to extend vase life and keep stems stain-free. Track which variety thrives in your site and refine selections the next season for continuous improvement.
A little planning — good soil, sun, and the right bulbs — pays off with bold stems and repeat blooms year after year.
Quick action checklist:
Expect upright flowers from late spring into midsummer — asiatic lilies bloom in concentrated waves and provide dramatic color for borders, beds, and cutflower gardens. Many varieties reach 2–4 feet tall; compact and dwarf types fit well in containers or tighter spaces.
Keep a simple log (Date | Bed | Variety | Depth | Notes) so you can track which plants perform best in your garden and refine plant asiatic lilies choices over time.
Want more detail? Visit our lilies guide for variety recommendations, seasonal calendars, and troubleshooting tips — or check local planting dates for your zone before you plant.

 Optimized by Seraphinite Accelerator