Beautiful flowers gardenia Plants For Your homes

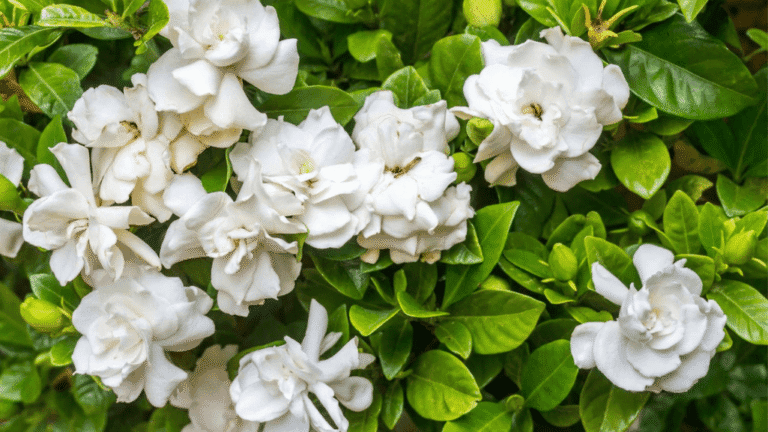
Gardenias are loved for their sweet scent and beautiful white flowers. They are elegant shrubs known as Gardenia jasminoides. They grow best in zones 7 through 11, where it’s warm.
When moving gardenia shrubs, they need special care. The best time to transplant is in the fall, after they’ve bloomed. Before moving, check for fungus or pests and fix any problems.
Before moving, trim the branches by a quarter to a third. This helps the plant focus on growing strong roots in its new spot. With the right tools and care, you can make your gardenia thrive in its new home.
Key Takeaways
- Gardenias thrive in zones 7 through 11 and prefer tropical and subtropical climates.
- The best time for gardenia transplanting is during the fall, just after the blooming season.
- Inspect the plant for fungus or pests before repotting gardenia plants.
- Prune branches by one-quarter to one-third a week before moving gardenia shrubs.
- With proper care and attention, relocated gardenia bushes can flourish in their new environment.
Understanding Gardenia Needs
To make sure your gardenia does well, you need to know about its light, soil, and water needs. Giving it the right conditions will make it healthy and full of fragrant flowers.
Light Requirements
Gardenias like full sun to partial shade. They do best in temperatures between 65-70°F (18-21°C) during the day. At night, they prefer it a bit cooler, around 60-65°F (15-18°C).
Choose a spot that gets morning to mid-day sun, which is better in warmer places. Most gardenias grow well in USDA zones 8-11. But some types, like Kleim’s Hardy and Frostproof, can handle colder temperatures down to zone 7.
Soil Preferences
Gardenias need acidic, rich, and well-draining soil. You can make the soil better by adding compost, manure, bark, or peat moss. It’s important to test the soil’s pH regularly and adjust it if needed.
Some gardenias, like those from Monrovia, are grafted onto Gardenia thunbergii rootstock. This makes them resistant to root-knot nematodes and helps them take up nutrients better.
“Gardenias require an organically-rich acidic soil with pH levels ranging from 5.0 to 6.5 for optimal growth.”
Watering Needs
Gardenias need consistent moisture. They should get about an inch of water each week. They also like humidity around 60%.
If it’s very dry, water or mist your gardenia to keep it moist. But don’t water too much, as it can cause root rot and yellow leaves. Make sure containers have drainage holes to avoid waterlogged soil.
- Water gardenias deeply and regularly, providing an inch of water per week.
- Maintain high humidity levels around 60% for optimal growth.
- Avoid overwatering, as it can cause root rot and yellow leaves.
Preparing for Replanting
When it comes to transplanting evergreen gardenias, preparation is key. To ensure your gardenia thrives in its new home, you need to choose the right time and select the perfect location. With a little forethought and care, you can give your gardenia the best chance at success.
Choosing the Right Time
The ideal time for gardenia transplant seasons is during the cooler months. This can be in the fall after the first frost or in early spring before new growth begins. This is when the plant is dormant and can better handle the stress of being moved.
In colder climates, spring transplanting is recommended. This gives the gardenia time to establish itself before winter arrives.
Consider these factors when timing your gardenia transplant:
- Avoid transplanting during extreme heat or cold
- Transplant when the soil is workable and not waterlogged
- Allow enough time for the gardenia to adjust before the next season’s challenges
Selecting the Perfect Location
Gardenias are particular about their growing conditions, so selecting the right spot is key. Look for a location with:
- Rich, acidic soil with a pH between 5.0 and 6.5
- Light shade, specially during the hottest part of the day
- Protection from strong winds and competition from other plants
- Good drainage to prevent root rot
Pro Tip: If your garden soil isn’t ideal, consider planting your gardenia in a raised bed filled with a suitable soil mix.
Gardenias prefer temperatures above 60°F and a humidity level above 60 percent. They require about one inch of water weekly, preferably through drip irrigation to avoid fungal leaf spots.
By choosing the right time and location for transplanting evergreen gardenias, you’ll set the stage for a healthy, thriving plant. This plant will reward you with its stunning blooms and intoxicating fragrance for years to come.
Gathering the Right Tools
Before you start replanting your gardenia, make sure you have the right gardenia transplanting tools and materials. Having everything ready will make the process easier for you and your plant.
Essential Gardening Tools
To transplant your gardenia successfully, you’ll need a few tools:
- Sharp pruning shears for trimming roots and foliage
- A sturdy shovel for removing the gardenia from its current pot
- A large pot or container with drainage holes, ideally 1-2 inches larger in diameter than the current one
When picking a pot, think about the material and how it affects your gardenia. Terracotta pots are good for root growth. Ceramic pots keep moisture in but might not drain well. Plastic pots are cheap but can cause root rot. Metal pots can get too hot in sunlight.
Potting Soil Recommendations
Choosing the right gardenia repotting soil is key. Gardenias need acidic, well-draining soil. Look for a mix with a pH of 5.0 to 6.0. It should have peat moss, pine bark, and perlite for moisture and nutrients.
A mix of basic potting soil with added organic matter like compost or peat moss is ideal for container-grown gardenias.
With the right tools and soil, your gardenia will thrive in its new home. Preparing well will reward you with a healthy, beautiful plant.
Steps How to Replant a Gardenia
Transplanting a gardenia is a delicate task. But with the right gardenia transplant instructions, your plant will thrive. First, get all the tools and materials ready. You’ll need a shovel, pruning shears, and a potting mix with a pH of 5.0 to 6.5.
Step 1: Remove the Gardenia
When removing the gardenia, aim to take as much of the rootball as you can. Loosen the soil around the plant carefully. This prevents damage to the roots. After loosening, lift the plant from the ground.
Step 2: Inspect the Roots
After removing the gardenia, shake off excess soil to see the roots. Do a detailed gardenia root inspection for damage or disease. If you find any bad roots, cut them off with pruning shears. This helps the plant absorb nutrients and water better in its new spot.
A healthy root system is the foundation for a thriving gardenia.
Step 3: Prepare the New Pot
Choose a pot that’s a bit bigger than the gardenia’s current one. Make sure it has drainage holes. Fill it with acidic, well-draining potting mix. Leave enough space for the rootball. Gardenias grow best in soil with a pH of 5.0 to 6.5.
Tip: Loosen and spread out the roots before placing the plant in the pot to encourage healthy growth.
Planting Your Gardenia
It’s time to give your gardenia a new home. Choose the right potting mix and a well-prepared container. Planting with care ensures it will thrive.
Step 4: Add Soil and Place the Plant
Start by adding fresh potting mix to the bottom of the new pot. Carefully remove your gardenia from its current container. Place it in the center of the new pot, at the same depth as before.
Add more potting mix around the sides. Gently tamp it down to remove air pockets. This ensures good soil contact with the roots.
Gardenias prefer acidic soil with a pH of 5.0 to 6.5. If needed, add organic matter or pH adjusters to the potting mix. This creates the best growing conditions for your gardenia transplant.
Step 5: Water Thoroughly
Water your gardenia thoroughly after planting. They need about an inch of water per week. Pour water slowly until it runs out from the drainage holes.
Water every other day for the first week. This helps the plant settle and reduces shock. Gardenias also like humidity around 60%, so misting or using a humidity tray can help.
With the right care and watering, your gardenia will soon adjust. It will reward you with lush foliage and fragrant blooms.
Post-Replanting Care
After replanting your gardenia, it’s important to care for it well. This ensures it adjusts smoothly and stays healthy. Key steps include adjusting light and temperature and keeping up with fertilization.
Adjusting Light and Temperature
Put your gardenia in a spot with bright, indirect light. Direct sunlight can burn its leaves. Gardenias do best in temperatures between 60-70°F (15-21°C).
Most gardenias can handle temperatures down to 20°F (-7°C). But they might struggle in very cold winters. If it gets too cold, move your gardenia indoors.
Fertilizing Your Gardenia
Fertilizing transplanted gardenias helps them grow well and bloom more. Use an acidic, slow-release fertilizer every 3-4 weeks when they’re growing. You can also use organic fertilizers like fish emulsion or coffee grounds.
“Seasonal slow-release fertilizer specific for acid-loving plants should be applied in spring and reduced post-flowering.”
Here are some tips for fertilizing your gardenia:
- Check the soil pH and adjust it to keep it between 5.0-6.5.
- Don’t over-fertilize to avoid harming the roots.
- Water your gardenia well before and after fertilizing to prevent root damage.
By giving your gardenia the right light, temperature, and food, it will do great. With the right care, it will grow well and give you beautiful, fragrant flowers for a long time.
Troubleshooting Common Issues
Even with the best care, transplanted gardenias may face stress like gardenia transplant problems. These can include yellow leaves, wilting, or leaf drop. These signs often point to watering issues or transplant shock. To help your gardenia, watch its watering closely and ensure the soil drains well to avoid root rot.
Be on the lookout for pests like whiteflies, aphids, and mealybugs. They can weaken a stressed plant. If you see these pests, use insecticidal soaps or horticultural oils to control them. A healthy plant can better fight off pests and diseases.
Signs of Stress in Gardenias
Yellow leaves can mean several problems, from root rot to fungal issues. If you see yellow leaves, first check the soil moisture and drainage. If the soil is too wet or not draining right, fix it and adjust your watering. Sometimes, you might need to use a fungicide to fight fungal growth.
Solutions for Common Problems
To help your transplanted gardenia thrive, address any stress symptoms quickly. Make sure it gets the right water, sunlight, and nutrients. If your area is dry, mist the leaves or use a humidifier. With care and patience, your gardenia will flourish in its new spot, adding beauty and fragrance to your garden.


